In a bid to streamline and simplify the registration process for micro, small and medium enterprises (MSMEs) in India, the government introduced the Udyam Registration portal replacing the earlier Udyog Aadhaar Memorandum (UAM) system. The transition from UAM to Udyam Certificate aims to enhance the ease of doing business for MSMEs and provide them with a host of benefits and opportunities. In this article, we will guide you through the step-by-step process of migrating from the UAM license to the Udyam Certificate.
How to Migrate from UAM License to Udyam Certificate
If you want to migrate from UAM License to Udyam Certificate then this available information can definitely help you. You only need to read the information available below and follow these steps.
Step 1: Understand the Udyam Registration Process
To begin the migration process it is crucial to familiarize yourself with the Udyam Registration process. The Udyam Registration portal is designed to provide a unified platform for MSME registration, which can be accessed at the official website of the Ministry of Micro, Small and Medium Enterprises.
Step 2: Gather the Required Documents and Information
Before initiating the migration ensure that you have the necessary documents and information at hand. You will need the UAM certificate, which includes your 12-digit UAM number, as well as other essential details such as your Aadhaar card, PAN card, business address proof and bank account details.
Step 3: Visit the Udyam Registration Portal
Once you have gathered the necessary documents, visit the Udyam Registration portal (https://udyamregistration.gov.in). On the homepage, you will find an option to migrate from UAM to Udyam. Click on the “Migrate UAM to Udyam” button.
Step 4: Provide UAM Details
On the migration page, you will be required to enter your UAM number and the respective registered mobile number or email address associated with your UAM registration. After entering the details click on the “Validate and Generate OTP” button.
Step 5: Verify OTP and Aadhaar Details
You will receive an OTP (One-Time Password) on your registered mobile number or email address. Enter the OTP in the designated field and verify your Aadhaar details. Make sure the Aadhaar details match the ones provided during your UAM registration.
Step 6: Update Business Information
After verifying your Aadhaar details, you will be directed to a page where you need to update your business information. Provide accurate details such as your organization’s name, type, address, contact information, and bank account details. Review the information carefully and make any necessary corrections.
Step 7: Self-Declaration and Final Submission
Once you have updated your business information, you will be required to make a self-declaration confirming the accuracy of the provided details. Read through the declaration carefully, select the checkbox, and proceed to the final submission.
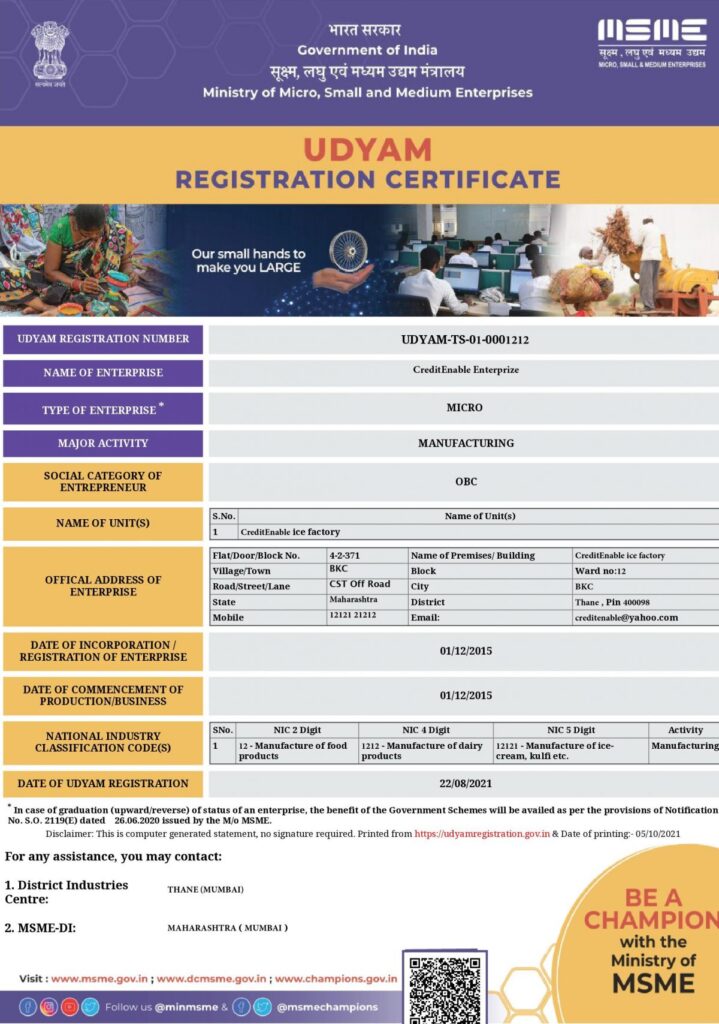
Step 8: Generation of Udyam Certificate
Upon successful submission, the Udyam Registration portal will generate your Udyam Certificate. You can download and save the certificate for future reference. The certificate will contain your Udyam Registration Number, date of issue, and other relevant information.
Conclusion:
Migrating from the UAM license to the Udyam Certificate is a straightforward process that enables MSMEs in India to benefit from streamlined registration procedures and avail of various government schemes and incentives. By following the step-by-step guide outlined in this article, you can smoothly transition from the UAM system to the Udyam Registration portal and ensure compliance with the latest regulations. Embrace this opportunity to leverage the advantages offered by the Udyam Certificate and propel your MSME toward growth and success.